Guides, tools, and templates.
Quick, actionable guides for content focused brands. 500ish words or less.
How to film interviews people actually want to watch.
A complete guide to filming corporate and documentary interviews, including lighting, audio, and camera setup tips. Plus, the one thing most people overlook.
Most interview videos are forgettable.
The lighting is fine. The framing is fine. The answers are fine. Everything is fine.
But they don’t make you care.
Maybe it’s the script. Maybe the gear. Maybe the B-roll isn’t “trendy” enough.
But the truth is simple: if the interview doesn’t land, nothing else matters.
Interviews are the backbone of great content.
Testimonials, brand stories, founder stories, documentaries, behind-the-scenes.
If you can’t capture someone speaking with clarity, emotion, and purpose, it all falls apart.
Yet interviews are usually an afterthought.
People throw on a mic, hit record, and hope for the best. But that’s not a strategy.
It’s a waste of time for you, your subject, and your audience.
When done right, though, interviews create something people want to watch.
Something that builds trust, shapes perception, and gives people a reason to take you seriously.
That’s what this guide is about.
The real-world process I use to plan and shoot interviews that actually work.
So whether you’re loaded with gear or running solo, here’s how to do it right. Start to finish.
And we’ll begin where every great interview starts: with the story you’re trying to tell.
How to plan your interview video to tell a compelling story.
Before we think about cameras, lights, or where we’re going to film the interview, we need to know why we’re filming an interview in the first place.
Is it a sales tool to build credibility? A recruiting piece to attract better talent? A brand story to solidify trust? Knowing this will help determine how we approach everything else. The questions we ask, how we capture it, and how the story comes together in the edit. Skip this step, and you might get lucky. Or you might end up with something that looks good but does nothing for your business.
You already know video is too much of an investment to gamble with.
Questions to answer before filming your interview video.
What’s the goal of this video?
Are you trying to build credibility, shorten the sales cycle, attract talent, nurture your audience, or something else?
Who is it for, and where will they see it?
Define the target viewer and the primary platform. A 2-minute homepage video is different from a 30-second Reel.
What story are we trying to tell?
Is this about a customer transformation, a founder’s vision, or a product development story? Getting clear on the core narrative shapes what you capture.
What action should the viewer take after watching?
Contact sales? Share it? Remember your name? Decide what success looks like before you hit record.
How will this fit into your broader content strategy?
Is it a one-off, or will it be repurposed into cutdowns, reels, or a series? Know where it fits before you spend the time.
How to pick and prep the best location for a video interview.
The location sets the tone for the whole interview. It affects the light, the sound, and how the person on camera actually feels. A good location lets people settle in and focus. A bad one makes the whole thing feel rushed, uncomfortable, or flat.
The good thing is, any space can work if you’re willing to make changes. The trick is not settling for what’s already there. Move furniture. Add things to the background. Do whatever you can to make it more interesting and fit the style of the interview. The difference comes from designing the set, not just showing up and shooting whatever’s there.
That said, often, the quality of your location comes down to access.
A small conference room with no windows and low ceilings might be easy to book, but visually, there's very little to work with. On the other hand, some of the best-looking locations are also the busiest. Warehouses, lobbies, and open office floors can look great, but they're often crowded, making it hard to get usable sound. But, if you're set on using them, plan to film during off-hours when there's less activity and more control.
With that in mind, I prefer to shoot in the client’s space whenever possible. It adds context and feels more personal. But if the space isn’t right, it’s worth looking elsewhere. A rented studio or Airbnb can be the difference between content that feels thrown together and content that feels intentional. No one has to know it’s not the client's office.
Interview location scouting checklist.
Here’s what I look for when scouting a space:
Room depth and ceiling height.
I want room to separate the subject from the background and raise my lights or boom mic without crowding the frame.Materials and surfaces.
Carpet, fabric, and soft furniture help absorb sound. Hard floors and glass walls create echo chambers that will destroy your audio. Warehouses, for example, are great for b-roll but usually a nightmare for interviews because of the reverb and background noise.Load-in and access.
Is there parking? Are there stairs? How far is the space from the nearest outlet? Don’t wait until shoot day to find out how difficult it is to get into a location, as it might change the kit you bring to the set.Windows and ambient light.
Natural light can look great, but it changes constantly. Pay attention to the sun’s direction, the room’s fixtures, and how much you can actually control. We’ll get into lighting in a bit.Control of the space.
Can you stop people from walking in and out of your shot? Can you turn off the AC? Unplug the fridge? Close the blinds? If not, you'll be fighting the room the entire time.
Once the location’s locked and you know what you're working with, the next step is deciding what your camera setup is going to look like.
Single vs. multi-camera interview setups.
While the strategy and location set the tone for the video, the camera setup is what brings it all together. It affects how connected the viewer feels, how clean the edit looks, and how easy it is to actually use the footage once it's shot. These are subtle things that are easy to overlook, but they make a major difference in the final outcome.
Choosing your primary frame.
Once I’m in the location, the first thing I do is find my primary frame. That’s the wider A-cam, and everything else is then built around it.
Depending on the complexity of the shoot, here’s how I think about it.
Single-camera interview setup: pros and limitations.
If we’re working fast or I’m shooting solo, I’ll sometimes run a single camera. It’s quicker to set up, easier to manage, and still looks great when it’s framed well. In that case, I’m usually going with a medium or close-up shot using a 50mm to 85mm lens. Those focal lengths give just the right amount of compression to make people look like themselves.
Shooting in 4K gives me breathing room in the edit. I can crop in and create a pseudo-second frame when I need it. While it’s just a punch-in of the main shot, it gives me something to cut to when someone restarts or goes off-track. That said, a single camera is still limiting. You don’t have much flexibility in the edit. It’s very much what you capture is what you get.
Two-camera interview setup: my go-to approach.
This is my go-to for most interviews. Two cameras give me one wider frame for context, and a tighter frame for emotion. Usually a 35mm or 50mm paired with an 85mm or 135mm. A general rule I follow is to double the focal length between the A and B cameras.
If I’m working solo, both cameras are locked off on tripods so I can manage the set. If I’m also conducting the interview, that’s the only way. But if someone else is asking the questions, then the B-cam can be handheld to add a bit of movement.
I like this setup because it gives me room to cut around stumbles, reshape the pacing, and draw attention to the moments that matter most. It also keeps things moving visually without being distracting. The one thing I always double-check is the eyeline between cameras. If the angles don’t match and it suddenly looks like the subject is talking to a different person mid-sentence, it kills the whole flow of the piece.
When to use three cameras (or more).
Once we go past two cameras, I’m working with a team.
If I’m running three angles, it’s usually a medium shot straight on, a tight shot slightly off-axis, and a third angle for something more creative. That could be a profile, high or low angle, or tight b-roll-style inserts. It adds flexibility in the edit and helps keep the pace from feeling flat, especially in longer-form pieces.
Three or more cameras aren’t necessary, but when they’re done right, they increase the production value in a big way. Of course, once you’re juggling that many shots, you need more hands on set.
Tripod vs. handheld: how I use both.
For most sit-down interviews, I keep everything on tripods. It’s clean, stable, and looks more polished. But when there’s at least a two-person team, I’ll sometimes add a handheld B-cam to mix in cutaways like hands moving, subtle reactions, or small environmental details.
That handheld angle adds texture and energy, especially in founder stories or less formal pieces. You just have to use it intentionally. Too much movement pulls attention away from what’s being said.
Framing techniques for interviews.
Here are the framing considerations I run through every time to make sure the interview looks sharp.
Headroom and eyeline.
I place the subject’s eyes on the top third of the frame. Whether they’re looking directly at the camera or off to the side, I make sure both cameras hold the same eyeline so the cuts between angles feel natural.Centered vs. off-center.
If it’s a testimonial or direct message, I center the shot. If it’s a story or conversation, I frame the person off to one side. When they’re off to the side or turned slightly, I leave more space in front of where they’re facing. Otherwise, the shot feels tight and awkward. That said, I’ll sometimes break this rule for creative framing if it fits the story.Background awareness.
Even though the location defines the background, I still spend time looking at what’s actually in frame. I want to make sure nothing’s distracting, like reflections, no weird signage, or anything awkwardly sitting too close to someone’s head.
Interview lighting tips: my real-world setup and best practices.
Lighting is what brings everything to life. It shapes mood, makes the subject look their best, and sets the emotional tone for the story. You can have the right location and perfect framing, but if the lighting is flat or uncontrolled, it will never feel professional.
The way I think about light is simple: it tells people how to feel. High contrast with deeper shadows feels dramatic and serious. Softer light with less contrast feels natural and approachable. Neither is wrong. What matters is that the choice matches the story you’re trying to tell.
Working with natural light.
Soft daylight can look incredible if you control it. The best time is when the sun isn’t blasting directly into the space, so morning or late afternoon are usually safer than midday. I’ll place the subject so the window acts as the key light, then put the camera on the shadow side of their face to add depth and dimension.
From there, it’s all about control. A sheer curtain or silk takes the edge off direct sunlight. A reflector or even a piece of white foam core can bounce light back into the shadows. A piece of black fabric on the opposite side as negative fill can deepen those shadows and make the face pop.
The challenge with natural light is consistency. It’s great for quick shoots, but if I know I’ll be filming for a while, I won’t trust the sun and clouds to stay the same. I’ll bring in artificial light to keep things stable.
One-light interview setup.
If I’m working with just one light, I use it as the key. I’ll place it about 45 degrees to the side and slightly above the subject’s eye line. This mimics window light and gives a natural falloff of shadow across the face. The bigger and softer the source, the better. A large softbox or bouncing it through diffusion usually does the trick.
If I need to, I’ll use the environment or a reflector to lift shadows. Or, if the room has too much ambient light, I’ll use negative fill on the shadow side to bring depth back into the face.
Two-light interview setup.
With two lights, the options open up. Most often, I’ll use the second as a backlight or hair light to separate the subject from the background. Sometimes I’ll use it to bring life into the background itself. Balance is the key. If the second light pulls more attention than the subject, it’s wrong. It should feel like it belongs in the room, not like I dragged in extra gear.
Three-light interview setup.
The classic three-light setup is key, fill, and backlight. I rarely add a dedicated fill unless the shadows are distracting. More often, I’ll let them fall off naturally and use negative fill for control.
What I do add light to is the background. A splash on the wall, a practical lamp in frame, or a subtle highlight creates depth and keeps the shot from feeling flat. These little touches make the image feel alive.
Advanced lighting techniques for interviews.
Once you start layering in multiple lights, the focus shifts from just the subject to the whole space. I’ll use practicals in the background to add warmth, edge lights for subtle highlights, and motivated lighting so it looks like the scene is lit by natural sources. These details make a shot feel cinematic without calling attention to themselves.
How to adapt lighting to the room.
Not every space makes lighting easy. In small rooms, I’ll bounce light into a wall or ceiling to soften it without eating up floor space. In large open areas, I’ll use flags to control spill and keep the focus on the subject. Reflective environments can be tricky, so I’ll reposition the subject or flag off shiny surfaces to avoid hot spots.
The trick with all of this is making sure the light feels motivated. The best setups look like the light belongs in the room, not like it was forced in. A simple way to get there is to start by turning off every house light. Overheads and mixed fixtures almost always create a flat look and mess with the colors in the frame. Once everything’s off, I build the lighting from scratch so every source has a purpose and feels like it belongs.
Interview audio setup: getting clean, professional sound every time.
Even though you can't see it, audio is the most important part of an interview.
Viewers will forgive a shot that’s a little soft or imperfectly lit, but they won’t sit through bad sound. If your subject sounds muffled, echoey, or drowned out by background noise, the footage is basically unusable.
Clean, clear audio is what keeps people engaged.
How room acoustics affect audio quality.
Before you even set up a mic, listen to the room. HVAC hum, traffic outside, a refrigerator in the corner, or even footsteps upstairs can ruin a take. If it’s loud now, it’ll be louder on a recording.
The second thing to watch for is echo. Bare walls, hard floors, and glass create reflections that make voices sound hollow. Soft surfaces like rugs, curtains, and blankets absorb sound and instantly improve a space.
Knowing how the room sounds changes the type of mic I'm going to use. A boom mic is usually best in a quiet, controlled space. A lavalier is safer in noisier rooms or ones with too much echo. No matter what though, keeping subjects away from walls and corners is best as that's where reflections are strongest.
Boom mic setup for interviews.
A boom mic is a directional microphone mounted on a pole, kept just out of frame. When the room is right, nothing beats it. It gives you an open, natural sound without worrying about clothing rustling.
Placement is everything, though. Keep it 6–12 inches from the subject’s mouth, ideally aimed at the chest or throat. Don’t point at the top of the head, and don’t drift closer or farther away as the subject talks. Consistency is what makes it sound natural.
Booms can struggle in noisy or echoey spaces. If there’s traffic outside, a loud air vent, or if the subject moves a lot, you’ll run into problems.
Lavalier mic placement and best practices.
A lav is the little clip-on mic you’ve seen in countless interviews. I like them when mobility matters, or when the space just isn’t good for a boom. If the subject shifts around or the room is working against me, lavs give me consistency.
I always aim to hide the lav in the subject’s clothing. Seeing a mic on camera looks unprofessional. I clip it mid-chest, about 6–8 inches from the mouth, and use tape or a small mount to secure it under a shirt or jacket. The trick is keeping it close enough for clean audio while avoiding fabric rub, jewelry, or hair brushing against it.
The tradeoff is sound. Lavs are closer and less natural than a boom. Not bad, just different.
How to record interview audio.
The best approach is to use both. A boom and a lav together give you a safety net. If one fails, you’ve still got the other.
Record them on separate tracks so you can choose the best in the edit.
I also record everything using 32-bit Float, which gives enough dynamic range to avoid clipping or not capturing quiet sounds.
And, while audio is the last thing to set up, good audio doesn’t happen by accident. Take the time to listen, set up carefully, and record with a backup. It’s the difference between a video people finish and one they turn off after a few seconds.
When to hire a crew and when you don’t need to.
You can see there’s a lot involved, and each part of production could be its own role: a Director of Photography for cameras, a Gaffer for lighting, a sound recordist for audio, and even someone dedicated to leading the interview. With more people, each area gets more focus, and the overall quality goes up.
That said, it’s not always necessary. I’ve run plenty of interviews on my own, and for most setups that works just fine. But if you want camera movement during an interview, or you’re working with a larger set that needs building, lighting, and fine-tuning, that’s when a crew becomes essential.
Of course, the tradeoff is cost. Adding more people always raises the budget, so part of my job is helping you decide when it’s worth it. Sometimes, lean and simple is the right call, and other times investing in a bigger crew gives you the polish and production value that really makes a piece stand out.
How I prep interview subjects to feel comfortable on camera.
Obviously, the most essential part of any interview is your subject.
The thing is, most people aren’t used to being on camera. They’re not actors, and they don’t want to feel like they’re being put on the spot. My job, or whoever is conducting the interview, is to make them as comfortable as possible so they can focus on sharing their story instead of worrying about how they look or sound.
My interview preamble goes over these few notes:
I start by giving them a sense of what we’ll cover. Depending on the subject and the topic, I might send them the themes ahead of time so they’re not going in blind.
I always tell them they can stop, restart, or redo any answer they like, which takes the pressure off immediately.
I remind them this will be edited, and my job is to make them look and sound their best.
And I ask them to slow down, breathe, and speak casually. It’s not about being perfect.
The goal is to create a space where they feel relaxed and excited to share their story.
Interviews matter more than you think.
At the end of the day, interviews aren’t complicated. They just need to be done with care.
And, if you plan the story, prep your subject, and don’t cut corners on sound and lighting, you’ll end up with something that feels real and people actually want to watch.
My complete backup strategy and workflow.
Almost every part of a photo or video project can be figured out after the fact, but it is impossible to recreate lost pictures and videos exactly as they were the first time. Here’s how to backup your data so you never have to worry about it.
The one question I never want to ask myself as a photographer and filmmaker is if the images I've created are backed up and secure.
I never want to ask because I never want to have to explain to someone why I no longer have the images they paid me to create.
Losing images is one of those things you don't think will happen to you until it does. A card is corrupted, files are unintentionally written over, or forgotten in the fury of things on set — simple mistakes that can be avoided altogether if a proper workflow is in place.
So, based on the 3-2-1 Method, here's my proven data management and backup strategy to ensure no image is ever lost from the moment it's captured, through editing, and eventually put into long-term storage.
Image capture.
The success of my backup strategy starts well before any images are captured.
Because for it to work properly, every step of the process has to be mapped out. There should be no question of where data is currently or what needs to happen next.
The key is creating a redundant copy as quickly as possible.
The best way to create a redundant copy is to capture images onto two cards if the camera has dual card slots. This way, two copies are saved simultaneously, and if anything happens to one card, you have another mirrored copy.
But not all cameras have dual card slots, so here's how to manage data captured onto a single card.
Multiple SD Cards.
I prefer to capture images across multiple cards rather than a single card for a whole shoot.
One card is a single point of failure, and everything would be lost if anything happened to that card.
I'm using the 128 GB SanDisk Extreme Pro card for video work.
128 GB is enough for a little over an hour of 4K footage, which is as much as I'd want on any one card.
For photos, I use the 64 GB SanDisk Extreme Pro cards, which hold about 2,000 photos.
Of course, smaller shoots may all fit on a single card, but anything more significant gets split across multiple.
Having multiple cards means parts of the day are captured on each. This way, the rest aren't affected if anything happens to one of them. The worst-case scenario is having to reshoot a segment of the day if it ever comes to it, which it never should, given what I do next.
On-set Data Check.
While it may seem like more of a hassle, the benefit of shooting to smaller cards is that you have to swap them out more frequently.
It's an opportunity to put the card into a laptop and check to make sure everything looks good.
This way, I can see the images on a larger screen and check for anything I may want to adjust, or, for whatever reason, and however unlikely, the card got corrupted, we can reshoot it right away.
I also do this throughout a shoot before changing a setup or moving to a new location, not only when a card is full.
On-set Backup.
At this point, there's only one copy of the data.
So, after I confirm everything looks good during the data check I'll duplicate the card to an external hard drive to create two copies.
Then the card gets a bit of tape put over it and placed in my Pelican Card Case to make sure it's not written over until I'm back in the studio and have data across multiple hard drives.
Editing workflow.
Once a shoot is wrapped and I'm back in the studio, I copy the data to three hard drives.
One drive will be my Live Work, a second will be my Live Backup, and a third will be my Backup Drive.
Depending on the size of the project these drives could be dedicated to the project itself or saved with multiple projects.
Live Work Drive.
The Live Work Drive is for anything being actively worked on. The assets and their Premiere Pro projects or Lightroom Catalogs all live here.
Live Backup Drive.
The Live Backup Drive duplicates the work on the Live Work Drive and is backed up daily. This way, the worst that can happen is that I have to redo a day's worth of work.
Backup Drive.
The Backup Drive maintains clean copies of each asset in case anything should happen to the other two drives. No work happens on this drive.
I remove the tape and clear the cards only after the data is copied onto these three drives.
Long-term storage.
After a project is over and the files are delivered, I'll prepare and store the data in long-term storage.
Data Cleanup.
While I'm particular about file structure and management, project files can still get a bit messy during editing. So, once everything is done, I'll go through and clean up any file names, delete unused files, and generally tidy things up so things are clean if I, or someone else, ever need to get back into a project.
It also helps reduce the file size as it goes into long-term storage. Yes, hard drives are "cheap," but there's simply no reason to pay to save things you'll never need again.
Archiving.
The data cleanup work happens on the Live Work Drive, as it's the most current version. Then, to archive a project, I copy the cleaned up files and folders to three places. Two Archive Drives and Google Cloud.
Archive Drives.
The Archive Drives have identical copies of the final project and all used files. One stays with me in the studio, while the other is off-site. I rotate these drives as new projects are added.
Google Cloud.
The same final project files are also copied to Google Cloud Archive each quarter.
Archive is their cheapest storage tier, meant for infrequent to never-needed retrieval. This is an off-site backup I'll hopefully never have to touch, but I sleep well knowing it's there in case anything happens to the physical drives I keep.
After the files have been copied to the Archive Drives and Google Cloud, I can remove them from the Live Work, Live Backup, and Backup Drives to make room for new projects.
As you see, the point is always to have multiple copies in multiple places so no one thing can wipe out your data.
What to read next.

The simple way to organize your folders.
There's an endless number of reasons you'll want to organize content a certain way. So, instead of a one-size-fits-all structure, here are a few frameworks for documents, photos, videos, and archiving projects.
There's an endless number of reasons you'll want to organize content a certain way.
But that doesn't mean all folder structures are sound. Some are naturally better than others.
First, I'll tell you how I organize my documents, photos, videos, and archived projects. Then, I'll share some best practices to follow in case you need to modify anything for what you do.
If you read nothing else, though, the key principle of folder organization is to keep the structure as simple as possible. You should be able to easily direct someone to what they need over the phone, even if this is the first time they've seen the folders.
Pair this with a straightforward file naming convention, and you'll be miles ahead of anyone else.
Organization Frameworks.
Different types of content require different organizational structures.
So, instead of a one-size-fits-all structure, here are a few frameworks to start from, depending on what you're organizing.
And the main types of content you'll need to keep organized as a creator or marketer are:
Documents
Photos
Video
Archiving
You should be able to fit other content into these or take bits and pieces from each to build whatever else you need.
Organizing Documents.
Here's the top-level structure I use for organizing my business and client docs. You can set up the folders within these however you want, as everyone does something a bit different, but I'll share a bit of what I do, too, so you get an idea.
Every file should have a home, you don’t want to let anything become an unorganized catch-all.
00-Admin
Admin is for client and vendor contracts, project estimation templates, registrations, and expenses.
00-Operations
Operations has process docs and templates along with a subscription tracker.
00-SuperAdmin
Super Admin is for banking and legal documents. If you have a team, this folder is only for the owners and anyone who helps manage the finances.
01-WESJONESCO
This brand folder has all your company branding, like logo lockups, letterhead, people photos, reels, case studies, and website copy.
02-Marketing
The Marketing folder contains all your marketing materials, like social assets and blog posts.
03-Projects
Sometimes, you need to treat an internal project like a client project, so those go here.
04-Products
If you sell your own products, you'll save and manage all of those assets and documents here in the Products folder.
05-Clients
All client work goes here and should be organized by date in their own Client Folder.
06-Resources
Resources are any creative asset or business guide. For me, it's a lot of photo presets, video LUTs, graphics packs, and some SEO and writing guides.
MISC
MISC is for things that don't have a home yet or only need to be saved for a short period of time. I don't treat this as a long-term storage folder, as it would just become a mess. So, it's more of an interim landing pad for things I don't know what to do with yet. And then, every so often, I'll go through and either move things to where they need to go or delete them if I don't have a use for them.
Also, I put numbers in front of these so they're organized in the order I like. If I didn't include the numbers, they'd be arranged alphabetically, and that would be fine, but not how I'd like them.
Organizing Photos Folders.
While I use Lightroom to catalog and edit my photos, there are a few other programs people use to do those same things. So, this structure is for organizing your photos on your hard drive rather than setting up the organization inside whatever editor you prefer, though often they'll mirror each other.
The three folders you need are RAW, Live, and Selects.

The backend organization of photo projects is relatively straightforward, while how you categorize images in your editor can be much more customized.
RAW
The RAW folder, obviously, has all of your RAW image files. These are then sorted in sub-folders by date. So, a brand shoot for my company, LIIP, on August 16, 2024, would be in a folder titled 240816-LIIP-BrandShoot.
Live
The Live folder is there for working images. Now, if you're only editing in a single program like Lightroom, you won't be saving anything here. But, if you're starting in Lightroom and then finishing an image in Photoshop, you'd save the Photoshop file here. You'll also want to create a folder with the same name as what you have in the RAW folder so they're clearly part of the same project.
Selects
The Selects folder is for your final images. And, like in the RAW and Live folders, you'll want to create another folder with the same project name so you know what's what.
Also, I recreate these folders in a top-level year folder like 2024, so I can easily archive a year's worth of work and not have to dig through a bunch of folders all the time.
Organizing Video Projects.
While similar to Photo projects, Video projects have many more assets to manage and, therefore, need a different structure.
The main reason for this is each video project is self-contained. This means each project will have all its assets saved within a singular folder structure without any crossover from one project to another. This way, projects can be easily transferred between computers or editors and later archived.
Every video project will have a main project folder and then sub-folders for each type of asset.

Video projects are best saved and managed independently from every other video project you’re working on.
Project Folder.
The Project Folder will include the reverse date for organization followed by the brand and project. For example, a launch video capture on January 15, 2014, for Liip would be saved to a folder named 240115-LIIP-LaunchVideo.
Then, the asset folders within the Project Folder are:
00-Premiere
The Premiere Folder is where I save the project itself. I edit in Adobe Premier Pro, which is why I named the folder Premiere, but you can call it whatever editor you use.
01-Motion
The Motion Folder is where I save all of my video assets. Depending on the size of the project, I may put all of the clips here. Or, if I have media from multiple cameras or different days, I'll further break them out however makes the most sense.
02-Audio
All of my audio clips then go into the Audio Folder, which is further broken down into folders of the different types of audio files I have. These audio sub-folders are Dialog, Ambient, Music, and SFX.
Then, like the Motion Folder, I'll create additional sub-folders if I need to separate things by recording device or day captured.
03-Graphics
The Graphics Folder is for any titles, overlays, or visual elements used in the project.
04-Stills
The Stills Folder is obviously there for any still images being used. Graphics can be still assets, but Stills to me is any photo image while Graphics are more of a rendering or visual.
05-Exports
All Final Exports are saved to the Exports Folder. Mostly, I'll put them all in the main folder and make sure I name them correctly so I know what's what if there's more than one. But, if needed, I'll create other sub-folders for the size or platform the video is going on if there are multiple.
Archive Organization.
Ok, so far, all of our assets and top-level folders have been organized by reverse date in their folder or file name.
Now, something I like to do when they go into my archive is to add another layer above those to categorize them by client or project type. When I need to go back and find something I worked on before, I more often remember the client or project type than the specific date I worked on it.
Then, inside these client or project-type folders, everything remains dated as they were initially.
This extra bit of categorization makes it super easy to find things no matter how long ago I worked on them.
Additional Considerations.
Settings up your folders doesn't have to be hard. But it takes being diligent, so here are a handful of things to consider as you either set up your folders or continue maintaining them.
The fewer folders, the better — you don't want to have to dig for every asset.
Be consistent, each project should mirror each other so you always know where to find things.
Be logical, do whatever makes the most sense for your project within these frameworks.
Don't let short-term storage pile up — everything needs a home.
Be able to tell someone where to find an asset without having to show them.
All this said, good file and folder structure doesn't matter if you don't have a proven backup strategy to protect your data from ever being lost or destroyed.
What to read next.
The ideal way to name your files.
Correctly named files are the difference between losing assets and your mind and being able to find things with your eyes closed.
How to name files was one of the first things I learned when I started my first job at an advertising agency.
And as simple as it seems, it's one of the most critical project management skills one can have. Correctly named files are the difference between losing assets and your mind and being able to find things with your eyes closed. Files are the atomic elements of a rock-solid data management system, and how they're named creates the organization for your organization.
My strategy is to name files so that someone who comes across one for the first time will have a general idea of what it is just by reading the name.
Like I said, it's not hard, but it takes diligence. Here's how.

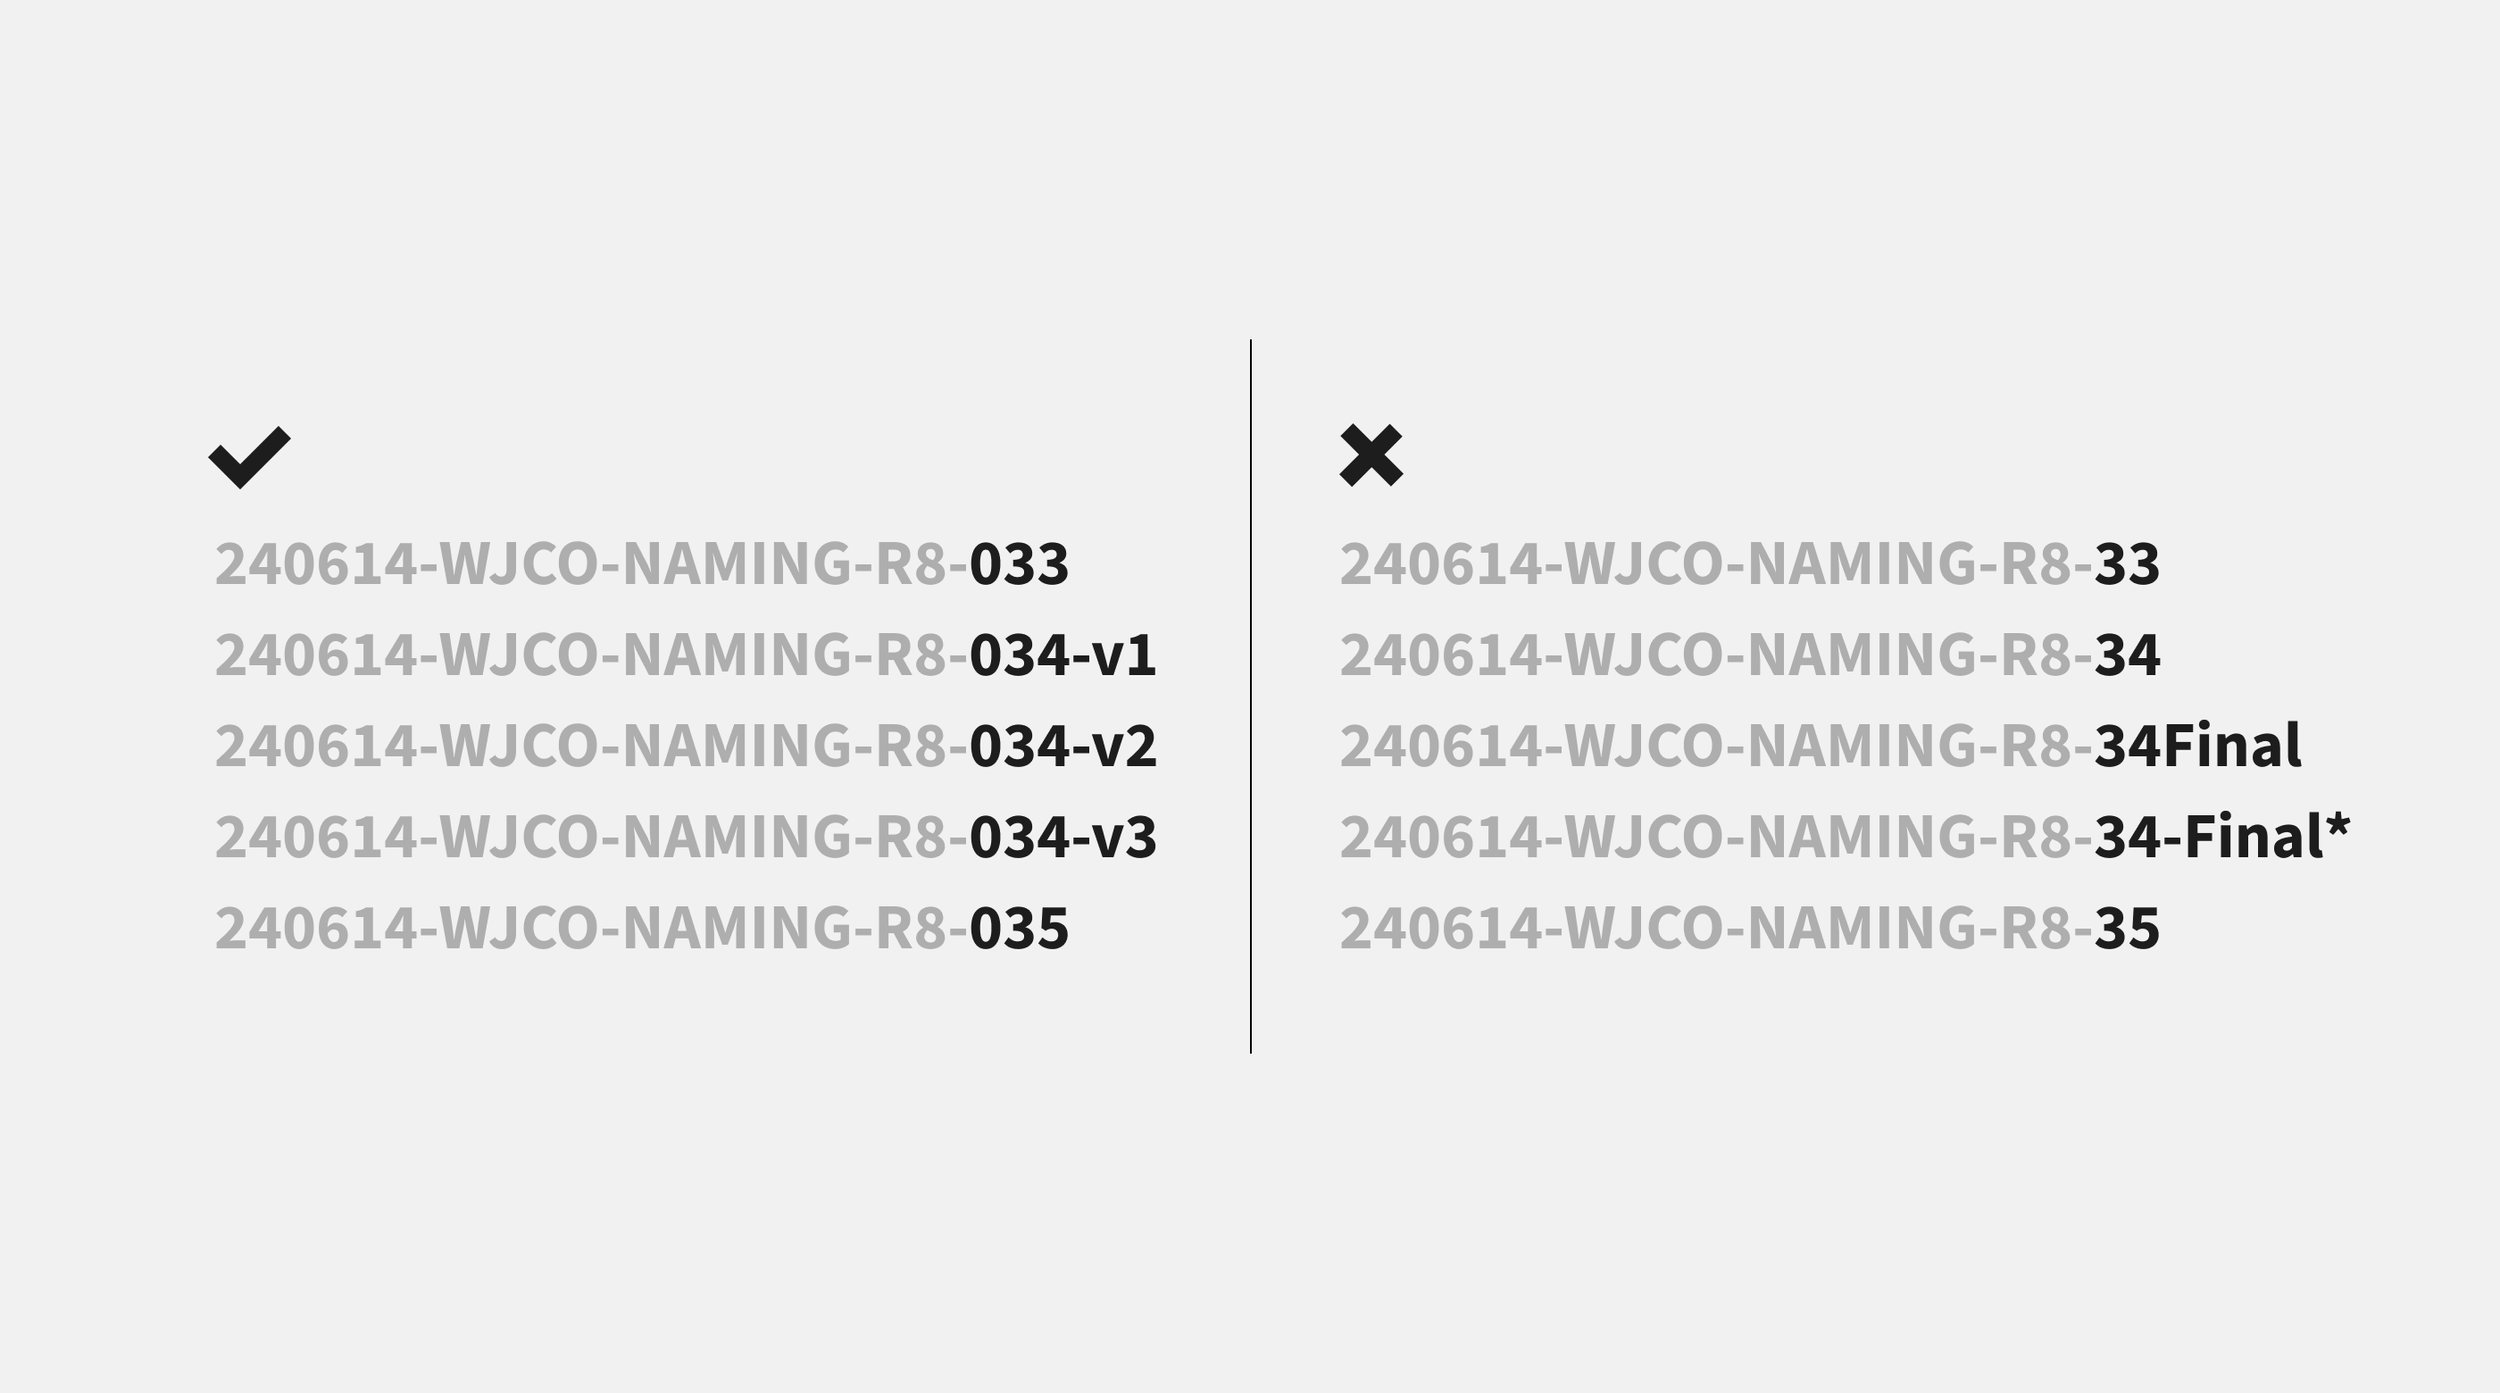
The best asset naming convention for content creators is YYMMDD-BRAND-PROJECT-HRDWR-00X-V#
Oh, and while this is mostly for photo and video assets, the naming convention applies to pretty much anything.
Hyphens only, no spaces, underscores, or special characters.
First, you only want to use hyphens to separate anything in your file name.
You shouldn't use underscores, and you definitely don't want to use spaces. This is because search engines will interpret a hyphen as a space between words while an underscore is read as a joiner. And, while you could use spaces, not all applications support spaces in file names, and it can cause errors if you try to load one in.
Also, don't use any special characters like " / \ [ ] : ; | = , < ? > & $ # ! ‘ { } () *. Those cause errors, too. Letters and numbers only.
Descending dates, first.
The key to this naming convention is all about how you type out the dates.

See how the ones on the left are all the same width while the ones on the right are different.
By starting with the Year > Month > Day, you inherently build in automatic sorting, as all files will order themselves by date.
And, while you could type out the whole year, like 2024, I like to keep it to just two characters to save space. Then, I'll also add zeroes to single-digit numbers to keep all dates the same width. So, June 14, 2024, becomes 240614.
By doing this, you'll be able to quickly navigate to any asset by simply knowing the date.
Brand code.
Following the date, I include a two to four-character code to identify the brand or project I'm working with.
Sometimes, this can be the full brand name like BMW or YETI. Or, it's an abbreviation like TNF for The North Face. Whatever makes sense to you and whoever you may be working with.
Project code.
Now, the Brand Code isn't enough to distinguish one project from another with the same brand, so you'll also need to come up with a shorthand for the specific project you're working on.
Naturally, this will be a bit more descriptive, but you also want to keep it relatively short. You want your file names to be at most 25 characters. The shorter, the better.
If you're at a specific location, you could use that, or if it's a studio shoot, you could use "studio." Or, if it's a fall campaign, you could use "fall-campaign."
Part of coming up with the Project Code is knowing everything in the file name provides context, so you don't need to rely solely on any one aspect of it.
Hardware code.
A Hardware Code isn't always necessary, but if you have a project where you're creating multiple assets at the same time and want to know where they came from, you should add this in before the Asset Numbering.
Specifically, I'm thinking of a photo or video shoot with multiple cameras or when you're capturing video and audio.
If that's the case, you'll want to quickly be able to identify which assets came from what camera or device.
For example, if you're on a shoot with two Canon R5 cameras and are capturing audio with a Zoom F3, you could add R51 to the first camera's files and R52 to the others, with F3 added to the audio files.
Asset numbering.
When importing your assets, you want to add them in the order they were captured starting from 1.
You'll also want to pad all numbers with additional zeros so they take up the same amount of space. This means if you have less than 1,000 but more than 100 assets, you would have three number spaces and start at 001. This makes sure each number takes up the same amount of space and is easier to read.

You should be using zeros to make all numbers the same width.
Then, the one thing I am conscious of when exporting some but not all of the assets is to make sure the Asset Number stays the same. You don't want asset 035 to become asset 004 after a partial export. It'll just be a mess trying to reconcile everything.
Version code.
Another "only-as-needed" aspect of this naming convention is adding Version Codes. Add these after the Asset Number so you don't break the rest of the system and can keep track of each new asset. To create these, I'll start by adding v1 and then increasing the number v2, v3, etc, with each new file.
You also need to be consistent with the way you name different versions of the same asset.
Consistency.
All systems are only as good as the people who use them. The key is being consistent. It only works if everyone is committed to it.
That's it, a simple, straightforward naming convention for your digital assets. The key is consistency, as this only works if everyone is committed to it. But how you name your files is only one part of it. You also need a systematic folder structure to keep them in and a backup strategy to keep them safe.
What to read next.
How to Airdrop content from your Mac to your iPhone 2x faster.
This shortcut lets you transfer content in just two clicks.
When I started creating content, transferring it from my computer to my phone so I could post it was always the most annoying step.
I'd finish editing a reel or a handful of photos for Instagram. Then I'd have to go through the tedious process of right-clicking, finding Airdrop, and making sure I wasn't accidentally sending the files to someone else's phone and waiting for it to get there.
But now I've figured out how to do it twice as fast and not worry about sending it to anyone I don't want to.
Let me show you how.
How to Add Airdrop to Your Mac Dock.
The trick is adding Airdop as an app to the Dock on your Mac.
Now, the first place you'd think to look to find Airdrop is the Applications folder. But you're not going to find it there.
Instead, here's exactly how to find it.
First, you need to open up Finder.
Then click Go in the Menu Bar.

You won’t find the Airdrop app in the Applications Folder, instead you need to search for it within Finder.
Next, select Go to Folder.
Then copy and paste this in the Search bar: /System/Library/CoreServices/Finder.app/Contents/Applications/
Click Enter, and the folder with all of the Finder apps will open.
Select Airdrop and drag it down to your Dock.
Unlike other apps, you don’t have to tell Airdrop to say in the Dock. It will always be there unless you remove it.
That's it for getting it in the Dock, but you can also add it to your Sidebar Favorites in Finder as well.
How to Add Airdrop to your Finder Favorites.
Open Finder.
Go to Finder > Settings from the Menu Bar.
Go to the Sidebar Tab and select Airdrop in the Favorites section.

Alongside Airdrop, you can customize what other apps or folders you want quick access to within Finder.
Now, you can access Airdrop from the Finder to drag and drop files from wherever.
Airdrop Speed Test Results.
These are minor optimizations, but now, instead of navigating through a bunch of menus, all you have to do is open Airdrop from the Dock. Select the content you want to transfer and drag it to the device you want to Airdrop it to. Or go into Airdrop directly from Finder if you're already there. Fewer clicks and no more worrying if you're sending the files yourself.
With the standard way, it takes 10.87 seconds to go through the Menus and Airdrop a file to yourself.
It takes at least four clicks to send content via Airdrop when you go through the menus.
But with the shortcut, it takes 5.57 seconds, nearly twice as fast as if you did it the other way.

Using the Airdrop app only takes two clicks to transfer content and is nearly twice as fast.
It's a slight difference, but these little tasks add up if you transfer content more than once a day.
What to read next.
The Best Premiere Pro Export Settings for YouTube.
Here are the Premiere Pro export settings you want to use to upload high-quality YouTube videos.
Here are the Premiere Pro export settings you want to use to upload high-quality YouTube videos.
I made export presets for all of these, which you can find at the bottom of this page.
Also, here are the settings for YouTube Shorts, Instagram Reels, and TikTok if you need those.

While YouTube tells us the exactly what we should upload, there are still a few tricks we can use to get even higher quality.
Premiere Pro Settings.
Format: H.264
Preset: Match Source - Adaptive High Bitrate
Basic Video Settings.
Frame Size: 1920x1080 HD or 3840 x 2160 4K
Frame Rate: 24, 25, 30, 48, 50, 60 FPS
Field Order: Progressive
Aspect: Square Pixels (1.0)
Render at Maximum Depth: Yes
Use Maximum Render Quality: Yes
Encoding Settings.
Performance: Software Encoding
Profile: Main
Level: 4.1
Export Color Space: Rec. 709
Bitrate Settings.
Bitrate Encoding: VBR, 2 Pass
Target Bitrate: 8 Mbps HD or 60 Mbps 4K
Maximum Bitrate: 12 Mbps HD or 65 Mbps 4K
Audio.
Audio Format: ACC
Audio Code: ACC
Sample Rate: 48,000 Hz (48 kHz)
Channels: Stereo
Bitrate: 320 kbps
Captions.
Export Options: Burn Captions Into Video
YouTube is for sure the best video player on the internet, and lucky for us, they very clearly lay out the exact export settings to get the best performance from it.
So, if all you do is follow what's above, you'll be in good shape. But I've learned some nuances and tricks that can lead to even higher quality if you want to try them, too.
Also, if any of these settings are grayed out, all you have to do is toggle the checkbox next to it to activate and edit them. Then, depending on your hardware, you might not be able to select some of these settings, and if that's the case, pick whatever is the next closest option.
Lastly, there are a lot of settings in Premiere Pro, but if I didn't mention them, that means they won't affect the quality of your video.
Format.
H.264 is the current standard video encoding format associated with high-quality video and moderate compression. Eventually, though, I expect YouTube will upgrade to the newer H.265, which allows for even higher quality with less compression.
Preset.
Once you have all of these settings, you can create a YouTube Export Preset so you don't have to update these settings each time.
Frame Size.
Here's the biggest trick I've found for uploading high-quality videos on YouTube.
No matter what your video resolution is, you want to export and upload it in 4K.
Do this even if all of your footage is 1080x1920. Upscaling will make an HD to 4K video sharper when it's played back again at a lower resolution as the pixels are recombined. Also, for whatever reason, it seems like YouTube gives 4K videos a little bit more processing or rendering power when they're uploaded and played back.
To do this, set your Frame Size in Premiere to 3840x2160 and then select Scale to Fit to proportionally upscale any smaller footage.
Frame Rate.
Since YouTube can play footage at any of the standard frame rates, the best thing to do here is to match your Sequence Settings to the Frame Rate you captured the footage in and then export it in the same.
Render at Maximum Depth & Use Maximum Render Quality.
You should enable these no matter what platform you are exporting for.
Hardware vs. Software Encoding.
Software Encoding will give you the highest quality output as it dynamically adapts to your video rather than be limited by whatever the hardware can or cannot do. It's a little bit slower than Hardware Encoding, but it's absolutely worth it to make sure you're exporting the best quality video you can.
Export Color Space.
YouTube recommends exporting in BT.709, but just know BT.709 and Rec. 709 are the same thing and will ensure the colors you see in Premiere will look the same after it's uploaded to YouTube.
Bitrate Settings.
While YouTube recommends a single encoding Bitrate, I like using VBR 2 Pass and setting the Maximum a little bit above their Target in case YouTube does any encoding or compression of their own.
So, with their guidelines and my preference of using VBR 2 Pass, here are the Bitrate settings to use:
1080p @ 24, 25, or 30 FPS.
Target Bitrate: 8 Mbps
Maximum Bitrate: 12 Mbps
1080p @ 60 FPS.
Target Bitrate: 12 Mbps
Maximum Bitrate: 15 Mbps
4K @ 24, 25, or 30 FPS.
Target Bitrate: 40 Mbps
Maximum Bitrate: 45 Mbps
4K @ 60 FPS.
Target Bitrate: 60 Mbps
Maximum Bitrate: 65 Mbps
File Size.
The daily maximum or maximum file size you can upload on YouTube is 256 GB, which is huge, so this really isn't something to worry about. I’ve also heard this goes away once YouTube decides you’re not spamming the platform with content.
Custom Thumbnail.
The perfect YouTube thumbnail is 1280x720 pixels with a file size of 2 MB or less.

1280x720 is a 16:9 image and matches the aspect ratio of your YouTube video.
And that's it. YouTube is probably the easiest platform to export for.
Premiere Pro Export Presets for YouTube.
Download my export presets for high-quality 4K and HD videos on YouTube.
What to read next.


The Best Premiere Pro Export Settings for YouTube Shorts.
Here are the Premiere Pro export settings you want to use for high-quality YouTube Shorts.
Here are the Premiere Pro export settings you want to use for high-quality YouTube Shorts.
You can download the presets for these export settings at the end of the article.
Also, here are the settings for YouTube, Instagram Reels, and TikTok if you need those.
While not as sophisticated as Instagram Reels or TikTok, YouTube Shorts can lead to wild channel growth on the platform.
Premiere Pro Settings.
Format: H.264
Preset: Match Source - Adaptive High Bitrate
Basic Video Settings.
Frame Size: 1080x1920
Frame Rate: 24, 25, 30 FPS
Field Order: Progressive
Aspect: Square Pixels (1.0)
Render at Maximum Depth: Yes
Use Maximum Render Quality: Yes
Encoding Settings.
Performance: Software Encoding
Profile: Main
Level: 4.1
Export Color Space: Rec. 709
Bitrate Settings.
Bitrate Encoding: VBR, 1 Pass
Target Bitrate: 8 Mbps
Audio.
Audio Format: ACC
Audio Code: ACC
Sample Rate: 48,000 Hz (48 kHz)
Channels: Stereo
Bitrate: 320 kbps
Captions.
Export Options: Burn Captions Into Video
If any of these settings are grayed out, all you have to do is toggle the checkbox next to it to activate and edit them. Also, depending on your hardware, you might not be able to select some of these settings, and if that's the case, check out each section below for what to do instead.
Then lastly, there are a lot of settings in Premiere Pro, but if I didn't mention them, that means they won't affect the quality of your video.
Format.
H.264 is the current standard video encoding format associated with high-quality video and moderate compression. Eventually, though, platforms will upgrade to the newer H.265, which allows for even higher quality with less compression.
Preset.
Once you have all of these settings, you can create a YouTube Short Export Preset so you don't have to update these settings each time.
Frame Size.
YouTube Shorts are vertical videos at 1080x1920.
Frame Rate.
While most other social platforms play at 30 FPS, YouTube Shorts will natively play 24, 25, and 30 FPS.
So, the best thing to do here is to match your Sequence Settings to the Frame Rate you captured the footage in and then export it in the same.
Render at Maximum Depth & Use Maximum Render Quality.
Check both of these, so Premiere adds whatever extra bit of quality it can.
Hardware vs. Software Encoding.
Though it will take a bit longer to export than Hardware Encoding, Software Encoding will give you the highest quality output. Software Encoding is better because it dynamically adapts to your video rather than being limited by whatever the hardware can or cannot do.
And for exporting a one minute or less video, the time difference will be hardly noticeable, if at all.
Export Color Space.
Exporting your project in Rec. 709 helps ensure your video has consistent and accurate colors as it goes from Premiere Pro to YouTube Shorts.
Bitrate Settings.
YouTube is specific about what Bitrate it likes for the footage you're uploading.
For 1080p videos at 24, 25, or 30 FPS, they recommend a Bitrate of 8 Mbps.
So, with Software Encoding selected, we'll use VBR 1 Pass and set the Target Bitrate to 8 Mbps.
File Size.
YouTube's file size limits are large enough not to worry about them. So, you'll be fine with whatever the file size is with the settings above.
Custom Thumbnail.
Unfortunately, you can't upload a separate Thumbnail file for a YouTube Short, but you can select a frame from your video.
And, while you couldn’t do this before, you can now go back and update the selected frame after you upload your Short. The only place you can do this is within the YouTube App.
Open the YouTube App, go to the “You” tab, and open “Your Videos”. Then, find the Short you want to edit and click the three-dot icon and select Edit. There, you can select a new frame for your cover photo as well as add a Filter and Custom Text.

Uploading Shorts with the YouTube App lets you use videos you've already made or you can create one in the app.
Uploading Shorts to YouTube.
Nothing on YouTube makes it clear you’re uploading a Short. Instead, YouTube will categorize your video as a Short if you upload a 1:1 or 9:16 vertical video that’s less than 60 seconds.

YouTube will make any square or vertical video that’s less than 60 seconds a Short.
Premiere Pro Export Presets for YouTube Shorts.
Download the exact export presets I use to export high-quality YouTube Shorts.
What to read next.

The Best Premiere Pro Export Settings for TikTok.
Here are the Premiere Pro export settings you want to use for high-quality TikToks.
Here are the Premiere Pro export settings you want to use for high-quality TikToks.
Also, here are the settings for Instagram Reels, YouTube Shorts, and YouTube if you need those.
Depending on where you’re uploading from, you need to make sure your file isn’t too big when exporting TikTok’s from Premiere Pro.
Premiere Pro Settings.
Format: H.264
Preset: Match Source - Adaptive High Bitrate
Basic Video Settings.
Frame Size: 1080x1920
Frame Rate: 30 or 60 FPS
Field Order: Progressive
Aspect: Square Pixels (1.0)
Render at Maximum Depth: Yes
Use Maximum Render Quality: Yes
Encoding Settings.
Performance: Software Encoding
Profile: Main
Level: 4.1
Export Color Space: Rec. 709
Bitrate Settings.
Bitrate Encoding: VBR, 1 Pass
Target Bitrate: 8 Mbps
Audio.
Audio Format: ACC
Audio Code: ACC
Sample Rate: 48,000 Hz (48 kHz)
Channels: Stereo
Bitrate: 320 kbps
Captions.
Export Options: Burn Captions Into Video
If any of these settings are grayed out, all you have to do is toggle the checkbox next to it to activate and edit them. Also, depending on your hardware, you might not be able to select some of these settings, and if that's the case, check out each section below for what to do instead.
Then lastly, there are a lot of settings in Premiere Pro, but if I didn't mention them, that means they won't affect the quality of your video.
Format.
H.264 is the current standard video encoding format associated with high-quality video and moderate compression. Eventually, though, platforms will upgrade to the newer H.265, which allows for even higher quality with less compression.
Preset.
Once you have all of these settings, you can create a YouTube Short Export Preset so you don't have to update these settings each time.
Frame Size.
All videos on TikTok have a vertical aspect ratio of 9:16 and have a max size of 1080x1920.
Frame Rate.
TikTok will play videos up to 60 FPS. So, I would choose either 30 or 60 FPS and make sure my export settings matched the Frame Rate I captured the footage in and my Sequence Settings.
Render at Maximum Depth & Use Maximum Render Quality.
Make sure you check both of these.
Hardware vs. Software Encoding.
While you might hear people say Hardware Encoding is better for performance, they mean the computer's performance, not the quality of your video. So, you want to select Software Encoding.
Export Color Space.
Export your project in Rec. 709 so the colors you see in Premiere Pro look the same on TikTok.
Bitrate Settings.
For TikTok, you can use VBR 2 Pass and set the Target and Maximum Bitrate to 10 Mbps.
File Size.
While there's no lower limit, TikTok does have different maximum file size limits for different devices.
Android: 72 MB
iOS: 287 MB
Desktop: 500 MB
You likely won't hit the limits when uploading online or from an iPhone. But you might have to adjust the Target and Maximum Bitrate to keep the file under the Android limit.
Custom Thumbnail.
Like YouTube Shorts, you can't upload a separate Thumbnail file for TikTok. But you can select a frame from your video. You just have to remember to do this before you upload it, as you can't go back and edit it later.
TikTok Settings.
Now, on the upload screen for every TikTok you're posting, you want to click More Options and then make sure Allow High-Quality Uploads is enabled. This, obviously, is going to make sure TikTok is uploading your video with the highest quality settings it can.

Unlike Instagram, you have to enable Allow High-Quality Uploads each time you upload a new TikTok.
Premiere Pro Export Presets for TikTok.
Download the exact export presets I use to export quality TikToks.
What to read next.
The Best Premiere Pro Export Settings for Instagram Reels.
Here are the Premiere Pro export settings you want to use for high-quality Instagram Reels.
Here are the Premiere Pro export settings you want to use for high-quality Instagram Reels.
To save time, you can download presets of these export settings at the bottom of the page.
Also, here are the settings for YouTube, YouTube Shorts, and TikTok if you need those.
Setting up Premiere Pro to export Instagram Reels.
Premiere Pro Settings.
Format: H.264
Preset: Match Source - Adaptive High Bitrate
Basic Video Settings.
Frame Size: 1080x1920
Frame Rate: 30 FPS
Field Order: Progressive
Aspect: Square Pixels (1.0)
Render at Maximum Depth: Yes
Use Maximum Render Quality: Yes
Encoding Settings.
Performance: Software Encoding
Profile: Main
Level: 4.1
Export Color Space: Rec. 709
Bitrate Settings.
Bitrate Encoding: VBR, 2 Pass
Target Bitrate: 20 Mbps
Maximum Bitrate: 24 Mbps
Audio.
Audio Format: ACC
Audio Code: ACC
Sample Rate: 48,000 Hz (48 kHz)
Channels: Stereo
Bitrate: 320 kbps
Captions.
Export Options: Burn Captions Into Video
If any of these settings are grayed out, all you have to do is toggle the checkbox next to it to activate and edit them. Also, depending on your hardware, you might not be able to select some of these settings, and if that's the case, check out each section below for what to do instead.
Then lastly, there are a lot of settings to consider, and if I didn't mention them, that means they don't apply to the quality of your video export.
Format.
H.264 is the current standard video encoding format associated with high-quality video and moderate compression. Eventually, though, platforms will upgrade to the newer H.265, which allows for even higher quality with less compression.
Preset.
Once you have all of these settings, you can create an Export Preset so you don't have to input them every time you export a reel.
Frame Size.
Instagram shows Reels at 1080x1920 and will scale videos to fit if they're not correctly sized. So it's best just to give it what it wants.
That said, something possibly worth trying is doubling the frame size to 2160x3840 and having it downscaled to 1080x1920 when Instagram encodes it. The only thing that makes me second guess this is the increased file size, possibly causing more problems than it's worth.
Frame Rate.
While we can argue the cinematic qualities of 24 FPS all day long, the native framerate of Instagram, and really all social platforms, is 30 FPS.
That said, you probably captured your footage in 29.97 FPS. So, you want to make sure your sequence setting matches at 29.97 FPS, and then you can export at either 29.97 or 30 FPS.
They're close enough that you won't have any syncing issues for the length of a reel.
Render at Maximum Depth & Use Maximum Render Quality.
It's hard to tell the difference when these are left unchecked, but why would you ever do that? Check them and know you're getting whatever extra juice Premiere will give you.
Hardware vs. Software Encoding.
Software Encoding will take a little bit longer to render your video, but it will result in the highest quality output as it can dynamically adapt to your video. Hardware Encoding, on the other hand, is more limited in its capabilities and prone to producing artifacts.
Another benefit of Software Encoding is it also allows you to use VBR 2 Pass for your Bitrate settings if you want to.
Export Color Space.
Exporting your project in Rec. 709 helps ensure your video has consistent and accurate colors as it goes from Premiere Pro to Instagram.
Bitrate Settings.
With Software Encoding, we can use VBR 2 Pass, meaning Premiere Pro will go through the video twice. This way, we can set a Target and Maximum Bitrate.
Now, everyone has an opinion on the best bitrate setting for Instagram reels, and it's a bit of a personal preference. After testing over 100 reels to see what looked best, I found 20 Mbps to be about as high as I'd want for my Target Bitrate.
I then usually set the Maximum Bitrate about 4 Mbps higher, or 24 Mbps.
That said, for shorter videos, around 15-20 seconds, I have been able to bump the Target and Maximum up while making sure the overall file size doesn't get too big. And I've also dropped them down to 8-14 Mbps for longer videos from 60-90 seconds.
File Size.
While File Size isn't a setting itself, I'm paying attention to it the whole time. The trick is getting the highest quality output with the lowest possible file size. And, of all the settings that affect quality, it really comes down to Bitrate determining the File Size.
And, while Instagram doesn't say their Maximum File Size, I aim to keep mine under 150 MBs. Which sometimes means deviating from the Bitrate recommendations above.
Cover Photo.
Whether you export a screenshot or create a graphic for your Reel Cover Photo, I like to export and upload mine at the same size as the video, 1080x1920. This way, the image will likely appear sharper if it's reduced and shown at a smaller size.

Instagram Reel Cover Photo’s are only ever shown in the Grid or Discover page.
That's it for export settings, but before you upload, you still need to do one thing to publish the best quality reels on Instagram.
Instagram Settings.
You only need to do this once, but make sure you go into your Instagram Settings and Privacy, then to Media Quality, and turn on Upload at Highest Quality.

You only have to turn on Upload at Highest Quality inside Instagram once for it to apply to all photo and video uploads.
Instagram Encoding.
Now, the last thing you want to hear, but the last thing you need to know is even after you export your video from Premiere with these exact settings, Instagram still might not show your reel at its highest quality.
This is because Instagram encodes your video file when it's uploaded and then serves different versions depending on a variety of unknown factors. These could be how popular a reel is, what country it's playing in, or how old a video is.
While there's no definitive answer to this, obviously, reels getting more views will be shown in a higher quality than those that don't. The only evidence I have is if you look at a reel posted a while ago, it will likely have a lower quality than one posted today.
What this really means is that while you can follow all of these steps for exporting and uploading high-quality reels, you still need to create content people want to interact with if you want your content to be seen at its highest quality.
Premiere Pro Export Presets for Instagram Reels.
Download the exact export presets I use to export high-quality Instagram Reels.
What to read next.
The Best Lightroom Export Settings for Instagram.
Here are the Lightroom CC export settings you want to use for sharp, high-quality images on Instagram.
Here are the Lightroom CC export settings you want to use for sharp, high-quality images on Instagram.
And then, here are the settings for Instagram Reels if you’re also creating videos in Premiere Pro.

The Lightroom CC Export Panel with the best settings for Instagram.
Lightroom Settings.
Image Type: JPG or PNG
Crop: 4x5
Dimensions: Custom
Short Side: 2,160 Pixels
Quality: 100%
Output Sharpening: Screen
Amount: High
Color Space: sRGB
Now, if you're interested, let's go through these, and I'll explain why these are the settings to use.
You'll also see a couple of other settings in the panel, like Metadata and File Name, but those don't affect image quality, so I'm not going into them here.
File type.
It doesn't really matter if you use JPG or PNG, but the general recommendation is to use JPGs for photos and PNGs for graphic or vector-based art. And since we're talking about images from Lightroom, it's best to use JPGs.
Crop.
The reason to post 4x5 images is because they take up the most real estate in the Instagram Feed.
Smaller image ratios like 1x1 and certainly 4x3 or 16x9 get scrolled past more quickly, and the point, of course, is to have people spend as much time with your content as possible, which they'll have to with a taller image.
Sizing.
The maximum width of any image on Instagram is 1080 pixels wide.
So, why am I suggesting exporting from Lightroom at 2160 pixes?
Well, because it's exactly double 1080, and when the larger image is scaled down, those pixels are combined to create an even sharper image.
Quality.
No matter what, every image is run through Instagram's compression algorithm as it's published, so we might as well give it the highest, 100% quality to work with.
Output Sharpening.
A lot of what's perceived as "high quality" on Instagram is really how sharp an image appears.
Typically, the Standard amount of sharpening is fine, but since your image is also going through Instagram's compression algorithm, which will knock it down somewhat, adding a little more with the High setting will help retain that extra bit of detail.
Color Space.
sRGB is the standard color space for screen displays. Knowing that, you'll want to export your image from Lightroom in sRGB so the colors remain consistent as they go from Lightroom to Instagram.
Instagram Settings.
Lastly, in Instagram, go to Settings and Privacy > Media Quality and turn on Upload at Highest Quality so Instagram isn't throttling your image quality any more than it needs to.
You only need to enable Upload at Highest Quality once for Instagram to always use this setting.
That’s it. Simple, straightforward settings you should use to ensure every image you export from Lightroom and upload to Instagram is as high quality as it can be.
What to read next.